
 This machine is in countless homes and nobody really has a major problem with them. At least that’s what I’ve seen over the years.
But I think the reason you’re reading this is that you do have an issue with your machine. Don’t worry, it’s not a big deal that we can’t overcome in today’s post.
Welcome to another edition of Neli’s DIY Appliance Repair Series. I’m going to go off script a little and talk about a few issues I’ve seen with this model, the Whirlpool WTW4850HW top load washer, and then cover some of the more common error codes.
Excessive Vibration
Oh yes, this is a common complaint, but for a DIYer like yourself, the solution might surprise you. You might be thinking there’s a major mechanical issue that will force you to replace the machine.
I won’t lie to you. That could be the case, but before you condemn the machine, let’s take a closer look at the causes of excessive vibration.
Here’s a list of common solutions:
- The bottom feet may not be in contact with the floor, and locked in place.
- Your washer may not be level. The idea here is to have equal weight on each of the four feet. If the floor sags or is uneven, you can use a minimum ¾” thick sheet of plywood (NOT pressboard) under the machine to help reduce the sound and vibration.
- Unbalanced load. When loading the machine, use the clock method and place loose heaps in the basket, starting at 12 o’clock, then 6 o’clock, then 3, and finally 9.
This will help start the machine with a balanced load, but whatever you do, never overload the machine. You’re inviting problems if the load becomes too heavy. The absolute limit for clothes in the washer is the top of the silver stainless-steel basket rim.
Also, many people feel the water level is too low. The HE process does not require the clothes to be submersed, and the control adds the necessary amount of water based on the load size. If you add water to the machine manually, you will cause the clothes to miss the agitator during the wash cycle and create poor wash performance.
The solutions here are relatively simple, and I believe most of you know them. However, other not-so-easy solutions require some thought and elbow grease. I won’t go into all the nuts and bolts of curing a vibration issue because they can get quite involved and beyond the scope of this post.
Suffice it to say that if you still have vibration issues, suspect the tub bearing on the gearcase, the basket hub, or the suspension rods, and in rare instances, the control, in that order. The control adjusts the spin speed slightly during operation based on the basket speed sensor readings. The sensor is part of the shift actuator.
If the bearing is starting to wear out, the first sign is the basket speed isn’t consistent and the control tries to keep the speed where it belongs. Any time the basket drags, the inrush of current to the motor causes the basket speed to falter, creating a sudden movement that allows the basket to shift to one side.
Depending on the speed when this happens, vibration occurs and is exacerbated by the weight and balance of the load.
Remember, if you need help troubleshooting a vibration problem, feel free to reach out to Neli, and we’ll walk you through the problem and the solution.
Common Error Codes
Here the more common error codes you’ll find in these washers. I’ve included only those you’re likely to see more than the others.
Use the following procedure to access diagnostics:

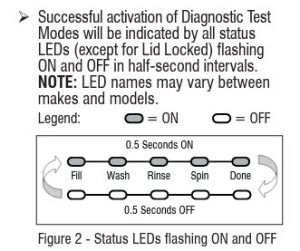
For the error code access, turn the selector dial until the status LEDs show the “Done” light ON, then press START to enter the error code display mode.
To view the last four codes, turn the dial CLOCKWISE to view each code in the order of most recent to the oldest. Any error codes clears automatically after 10 error-free cycles in a row.
To clear existing error codes from memory, turn the dial until all the LEDs are flashing on and off. Press the START button for 3 seconds to clear the codes and exit the code display mode.
All fault/error codes have an F# and an E#. The F# indicates the suspect System/Category and the E# indicates the suspect Component system.
Error Code List


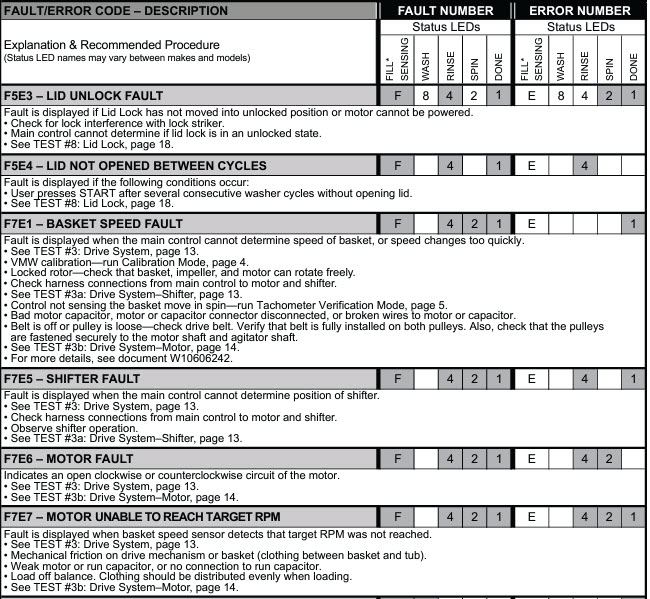
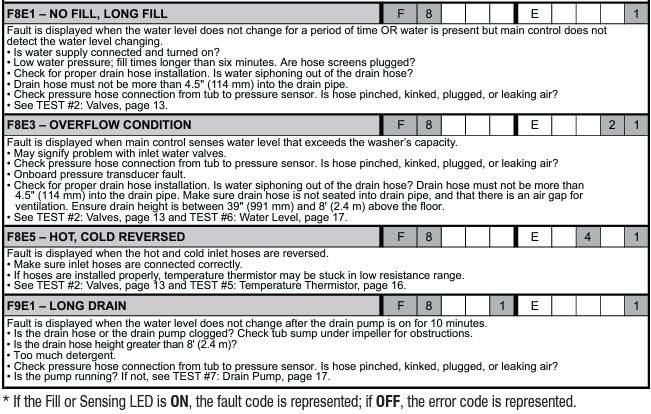
This list will come in handy when you need it the most, but even better, you can use the tech sheet included with your machine. It’s usually under the control panel on top of the machine. If it’s missing, as they sometimes are, you can always refer to this list.
I know how it is when you’re not comfortable with something new, but I can tell you that these machines are dependable and well-built. If you treat it like a machine and take care of it, there’s no reason to worry.
If you think because it’s a machine it should always work, you will be disappointed. So, please, treat it right, and you’ll get your money’s worth. As always, if you need help with your machine, Neli is here to help. Just book an appointment, and we’ll walk you through the problem and get you back running.
We’ll see you again soon for the next edition of Neli’s DIY Appliance Repair Series!
Need Some More Help?
Book an appointment with one of our expert technicians today.
